The Stones System
Combat System
You can go through the early stages of the game by just tapping the attack button. After a point, opponents will start resisting your attacks, especially the bosses. Here are some tips on using the system to your advantage.
Character Types
The first thing to know about characters is that they are divided into three types.Elements & leverage
There are 5 elements
This is extremely important due to the leverage system. The colours indicate a strength over one and a weakness to another.
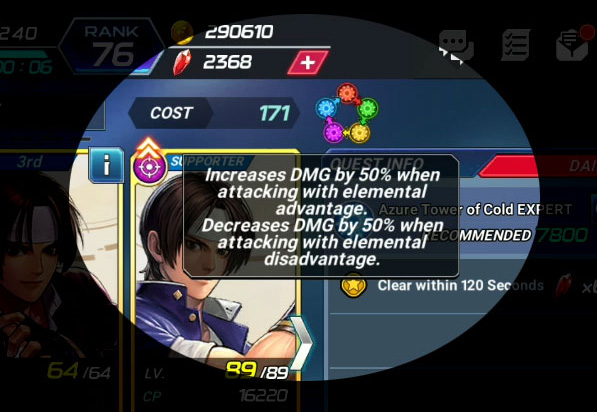
You can see these in the forms of icons above the opponents’ heads. The opponent has a blue icon. The arrow up does not mean they are stronger, it means they will get hit for 50% more damage because of LEVERAGE.
LEVERAGE
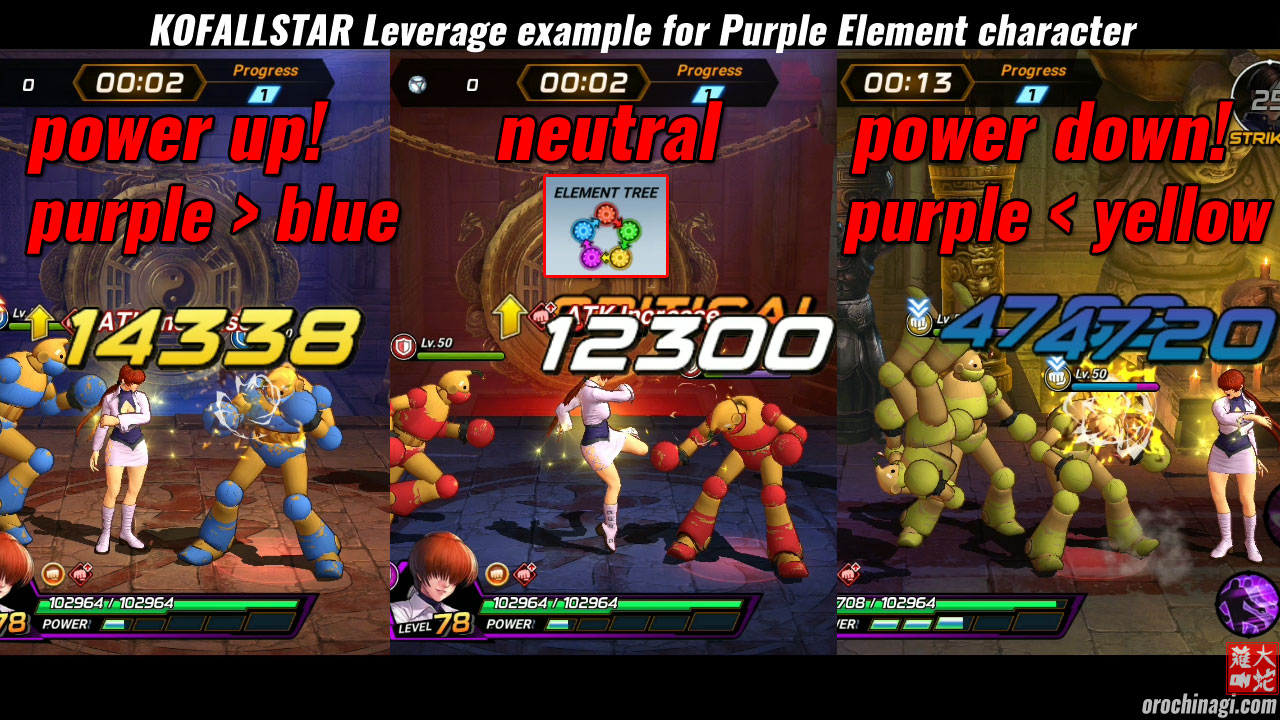
The game system revolves around colours. As we can see in the image, Red has an advantage over Green, Green over Yellow etc, anything else is neutral. It goes clockwise. If you have a blue character and you get hit by a purple character, they are going to hit you with 50% more damage!!!! If the purple character gets hit by the blue character, they get 50% less damage. However, if you are strong enough (say, double the level), it doesn’t really matter.
You will see the damage values are in yellow when you have the correct leverage and purple when it’s a disadvantage and grey / white when the leverage doesn't apply.
At level 50, Robert (green) struggles against a level 52 red boss but against a level 27 red boss, it's normal damage.
Be very careful when starting a stage, check the element colour!
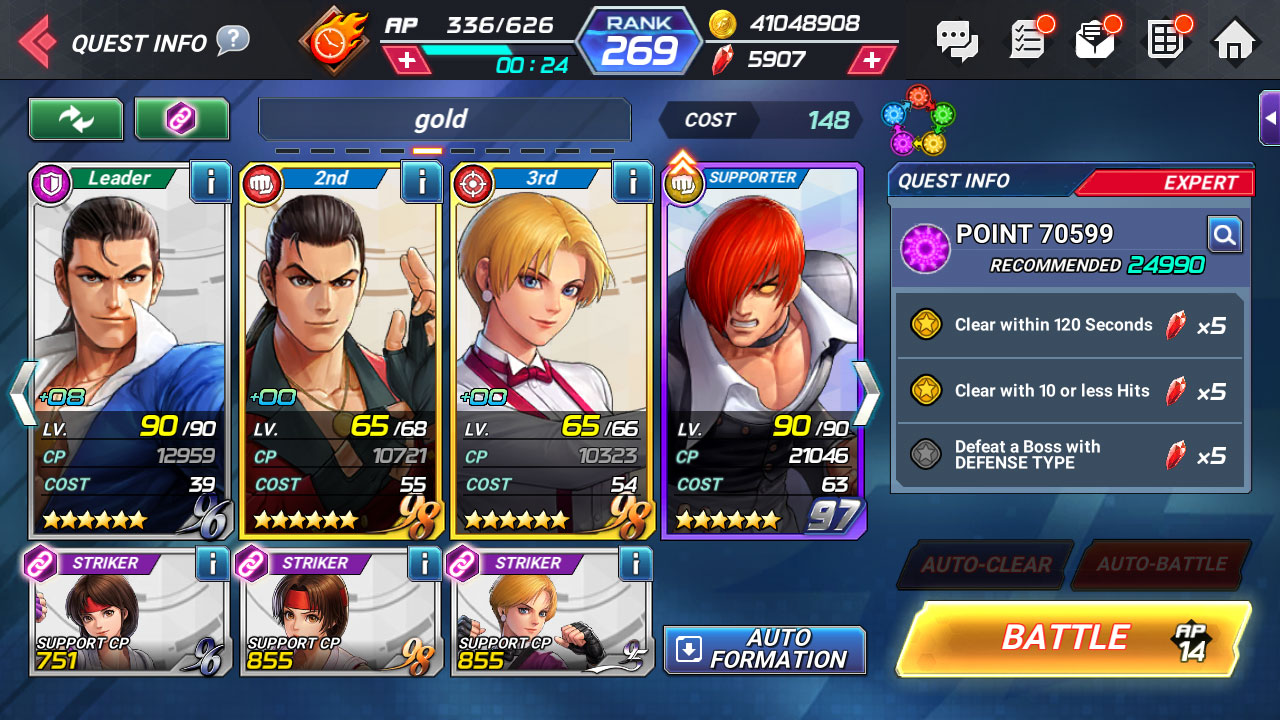
In this example, the quest Point 70599, is a purple element, therefore most (not all) are subceptible to yellow. Picking a different colour will remain neutral, while picking a blue element means the mission will be much more difficult as the opponents will take 50% less damage!
Keep this in mind when you try to clear story mode too.
With leverage you can ignore the warning when it tells you your CP is too low! Bear in mind cores will help.
Using a real time example, ’97 Athena is level 69 with all cores but no buffs. Her CP is 9057. With a level 80 buffed Shermie she gets 1060 bonus. So in total that’s 10k CP. KOF98 Chapter 7 episode 2 on hard mode advises you to have 16K CP. With leverage, even without a supporter, Athena can solo it easy on AUTO, and she doesn’t even have her action card. AND the level 76 boss will get STUCK and STUNNED.
A yellow level 64 Athena (with cores) will destroy green level 80 Mature. Your yellow supporter will inflict relatively huge damage too.
When you get surrounded by enemies it's going to be more problematic. At level 90 you can ignore leverage until opponents reach level 60 (Hard mode '94), where the opponent strikes will start to significantly hurt, and you won't be able to ignore the leverage any longer.
You can extend your lead with some capsules, and some clever manual control, but it’s just easier to use the correct leverage colour. This is why you need five characters, 1 of each colour.
There are also some features in the fighting system that can help you.
The Fighting System
Manual mode gives you full control of your character. Walk around and press the attack button to defeat the opponents on the street. Usually after a string of attacks, the opponent will be pushed into the air, here's your opportunity to use a special move, and then/or your super move! You may need to experiment to see which moves combo in which order.
In Semi automatic mode the CPU will take control and do everything apart from executing special moves. You can override the CPU anytime you want, by tapping buttons to move or do special moves to finish its combo attack. It’s a good way to manage your resources, for example letting the CPU do most of the level before you reach the boss, where you will need more precise strategies.
If you put the game on auto mode, the computer will often show you very good combos but burn all your resources, and likely never guard.
Guarding and rolling
At the start of the game, the opponents are literally punching bags. When you get to a harder level they will not flinch as you hit them and will attack. This is where you need to guard or evasion roll. Guarding will still take damage but you won't fall over, it also won't count as a hit for the quest requirements such as 'get less than 10 hits'. At a higher level the opponents will have a penetration rate and burn through your guard, draining your energy.
If you want to move quickly out of the way, it's time to roll! You are invincible until the end of the roll. You can avoid all kinds of attacks! Just tap the button and swipe left or right. If you'd prefer to just tap, you can change this in the options.
Evasion roll is a little different and the most important feature for defense. While you are being hit, if you press roll, it will activate the Evasion roll which will move you out of harm's way. You can swipe to roll left or right but either way, it needs to recharge. Note also that it only works on the first hit of a combo, as you're then stuck in a hit animation, but as soon as the combo ends you can roll. This also works against grabs, which traditionally isn't possible in KOF. If your opponent evasion-rolls your special move towards or past you, you can hit them if you immediately cancel into another move.
Tagging
When you switch between characters you are invincible and this is a vital part of escaping attacks from bosses and strong opponents. If you tag next to an opponent, they will be sent upwards by the impact, and can be comboed! So you can use this to interrupt an attack. You can also use a tag as part of a combination attack, using all three of your team to crush the opposition! However, there is a cooldown timer after a tag, in which time you cannot tag, so choose the moment wisely!
Certain ailments which cause continual damage such as burn and poison will not stop when tagging out, so consider using strikers to cure the condition before doing so!
Leaders, Strikers and Supporters
The first character in your team is the leader and has special advantages that they can pass on to their team. For example, some will give an attack buff to the same element. Others will support the same gender, some get a buff from just being weak!
Strikers will jump into the match, perform an action and then leave. A timer will start before you can call them again.
Supporters will join you for around 5 seconds but cannot be called more than once. They are usually called in to help fight the boss. When starting a game always check the leverage and bring a striker and supporter that matches. There are some strikers that have unique abilities that can hit the enemies weakness. Certain strikers have links to yours, which will give a beneficial effect! The game encourages you to make friends and join guilds because your selection becomes wider including comrades who may own ultra strong characters at level 90!
Strikers should be levelled to the max with all cores and buffs to give the maximum CP boost to your character, as CP boosts your stats. As for the cards equipped to your striker, these only need to be maxed - their skill levels don’t make any difference.
Notable skills
This list is not comprehensive, and does not include personal relationships and buffs between characters! Have a look around, the characters with special boost links are always put at the top, when you are selecting a striker.
Damage up/down
Super Armour
Healing
Cooldowns
Reduction of Damage
Stunners
Bleed
Critical Rate
Petrify
Freeze
Power Charge up
Burn Reduction
Poison
Disable guard
Damage Reduction
Burn
Attack Speed
Shock
2x combos
Notable Leader skills
Large Attack boost
Super move damage buff
Fun Team relationships
You can see the members in the codex; these give bonuses such as 2% health bonus or 1% attack up. Something else to consider when thinking about the synergy of your team.The full list of striker and leader abilities can be found on Shifty Hustle's amazing work - just open the menu to find it
Problems and Tips
When faced with a leverage disadvantage and lower CP, the CPU has a tendency to stop blocking and not do any moves so you should press the buttons to help it. Yes, your inputs override auto mode.
The CPU also does not understand the danger of standing on a red area and will fail to block big boss attack moves, so you need to be around to help them dodge or move out of the way.
You can use these modes in Arena and league modes, and if your CP is higher than the opponent's, the CPU will usually win for you. They can tag automatically in league match but you may not agree with its strategy!
The power bar
This builds as you hit the opponents with basic attacks. Each character has a power gauge (PG) rating. This means that the character can perform their super move when reaching this number. Some characters have PG 3 so they can do supers more often!
When it reaches max you can do your ultimate.
Stuck
when the level between opponents is too great, upon being hit, there is a chance that the weaker adversary will freeze, becoming stuck for a moment!
Super Armour
The bosses of each mission often turn on super armour after taking a hefty amount of damage. When this happens they will ignore your moves and try to hit you. They are still taking damage, however. To break this, hit them with a super move.
Hyper Armour
This mode does not take any damage.
Damage Immunity
Like hyper armour, no damage, but responds to attacks as normal, and can be sent flying across the screen.
For fighting human opponents there are a few more things to remember, please read the Match and Battle section
